Katkıda Bulunmak
Bu dökümantasyon kaynağı katkıda bulunmak isteyen herkese açıktır. İhtiyacınız olan şeyler GitHub üzerinden bir hesap ve birazcık boş zaman. Git'i bilmenize gerek yok, giriş yaptığınız arayüz web arayüzünden her şeyi yapabilirsiniz.
Belirli bir dilin sayfasını yaratmak istiyorsanız, CODEOWNERS dosyasına diliniz ve kullanıcı adınızı içeren bir satır yazın. (TR sayfalarını geliştirecekseniz bu sayfayı düzenlemenize gerek yok).
İçerik Düzenlemek
Her sayfada düzenleme yapabilmek Github düzenleme sayfasına yönlendiren buton vardır.

Örneğin, SetVehicleAngularVelocity bu tıklatma bu sayfa sizi bu dosya üzerinde değişiklik yapmanız için yönlendirir. (eğer ki github üzerinden oturum açtıysanız).
Düzenlemenizi yapın ve bir "Pull Request" gönderin. Wiki üzerinde çalışan takım üyeleri yaptığınız değişiklikleri onaylandığında(incelenmesi ardından) yaptığınız değişiklikler yayınlanır.
Yeni Bir İçerik Eklemek
Yeni içerik eklemek biraz daha fazla ilgi ister. Bunu iki şekilde yapabilirsiniz:
Github Web Arayüzünü Kullanmak
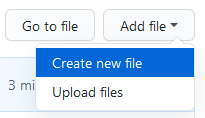
Github'da bir dizine göz atarken dosya listeninin en sağ üst köşesinde bir "Add File(Dosya Ekle)" düğmesini göreceksiniz.
Önceden yazdığınız bir Markdown(.md) dosyasını yükleyebilir veya doğrudan GitHub metin düzenleyicisini kullanarak yeni bir içerik ekleyebilirsiniz.
Yarattığınız dosyaların bir uzantısı olmalı ve bu uzantı Markdown(.md) olmalıdır. Markdown hakkında daha fazla bilgi için bu dökümasyona göz atabilirsin. this guide.
Bu aşamalar bittikten sonra "Propose new file" tuşuna basarsanız "Pull Request" sayfasına yönlendirilirsiniz ve "İçerik Düzenlemek" başlığında yazıldığı gibi yeni içeriğinizi yaratabilirsiniz.
Git
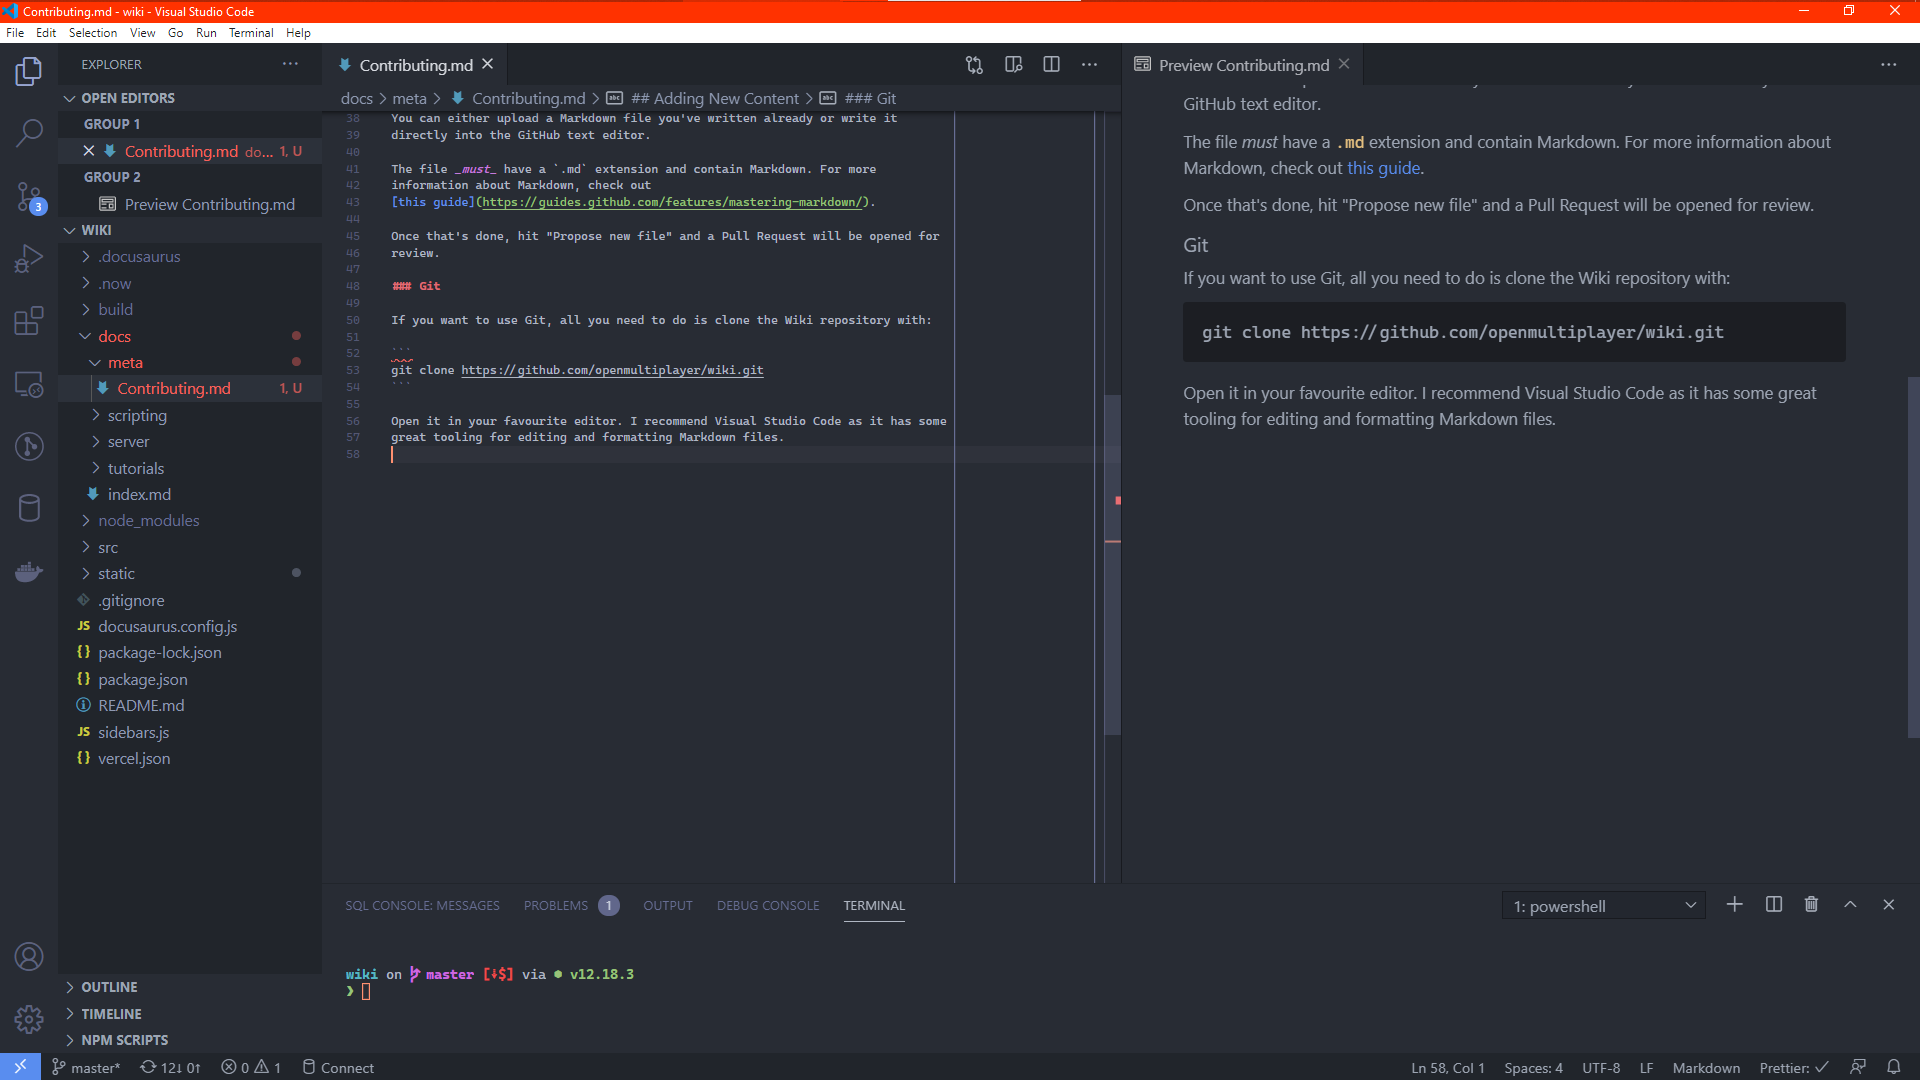
Eğer Git'i kullanmak istiyorsanız, tek yapmanız gereken Wiki dosyalarını aşağıdaki kod ile klonlamaktır.
git clone https://github.com/openmultiplayer/web.git
En sevdiğiniz editörü açın. Ben düzenleme yapmak için Visual Studio Code'yi öneriyorum. Markdown dosyalarını biçimlendirmek için güzel bir editör ve gördüğünüz gibi ben Visual Studio Code kullanıyorum.
Bu işlemleri kolaylaştırmak ve daha rahat hale getirmek için iki Visual Studio Code eklentisi öneriyoruz.
- markdownlint by David Anson - this is an extension that makes sure your Markdown is formatted correctly. It prevents some syntactical and semantic mistakes. Not all the warnings are important, but some can help improve readability. Use best judgement and if in doubt, just ask a reviewer!
- Prettier by the Prettier.js Team - this is a formatter that will automatically format your Markdown files so they all use a consistent style. The Wiki repository has some settings in its
package.jsonthat the extension should automatically use. Be sure to enable "Format On Save" in your editor settings so your Markdown files will be automatically formatted every time you save!
Notlar, İpuçları ve Conventions
Linkler
Siteler arası bağlantılar için doğrudan URL'leri kullanmayın. Göreli yollar ile URL'leri tanıtın.
Demek istenilen:
-
❌
To be used with [OnPlayerClickPlayer](https://www.open.mp/docs/scripting/callbacks/OnPlayerClickPlayer) -
✔
To be used with [OnPlayerClickPlayer](../callbacks/OnPlayerClickPlayer)
../ olarak gördüğünüz şey "Bir dizin yukarı git" anlamına gelir, yani eğer functions klasörünün içerisindeki bir dosyayı düzenlerken callbacks klasörünün içerisindeki bir dosyaya yönlendirme yapmak istiyorsanız ../ kullanarak scripting/ klasörüne geçmeli ve callbacks/ yazarak callbacks klasörüne girmelisiniz, aradığınız dosyanın uzantısını eklemeden (.md olmadan) tanıtmalısınız.
Resimler
Resimler '/static/images' klasörünün içerisindeki bir alt dizine girer. Bir görüntüyü ![]() ile gösterebilirsiniz. Temel yol olarak /images/ kullanıyorsunuz.
Eğer nasıl yapılacağını anlamadıysanız (anlatım İngilizce olarak da biraz sorunluydu bu yüzden biraz yanlış yazılmış olabilir). Başka sayfalarda resimlerin nasıl yayınlandığını inceleyin ve kopyalayıp yapıştırın.
Meta Verileri
Herhangi bir sayfada ilk şey meta verileri olmalıdır:
---
title: Benim Döküm Sayfam
sidebar_label: Benim Döküm Sayfam
description: Bu sayfa eşyalar ve burgerler hakkında bir sayfa, yaşasın!
---
Her sayfanın bir başlığı ve bir açıklaması olmalıdır.
---, etiketlerinin arasında nelerin bulunabileceği için dökümasyonu inceleyin. the Docusaurus documentation.
Başlıklar
seviye 1 başlık için (<h1>) kullanmayın. # otomatik olarak oluşturduğu için her zaman ## ile 1. seviye başlık belirleyin.
-
❌
# Benim BaşlığımBu dökümasyon ... için# Sub-Section -
✔
Bu dökümasyon ... için## Alt Bölüm
Use Code Snippets For Technical References
When writing a paragraph that contains function names, numbers, expressions or anything that's not standard written language, surround them with `backticks` like that. This makes it easier to separate language for describing things from references to technical elements such as function names and pieces of code.
-
❌
The fopen function will return a value with a tag of type File:, there is no problem on that line as the return value is being stored to a variable also with a tag of File: (note the cases are the same too). However on the next line the value 4 is added to the file handle. 4 has no tag [...]
-
✔
The
fopenfunction will return a value with a tag of typeFile:, there is no problem on that line as the return value is being stored to a variable also with a tag ofFile:(note the cases are the same too). However on the next line the value4is added to the file handle.4has no tag
In the above example, fopen is a function name, not an English word, so surrounding it with code snippet markers helps distinguish it from other content.
Also, if the paragraph is referring to a block of example code, this helps the reader associate the words with the example.
Tables
If a table has headings, they go in the top part:
-
❌
| | || ------- | ------------------------------------ || Health | Engine Status || 650 | Undamaged || 650-550 | White Smoke || 550-390 | Grey Smoke || 390-250 | Black Smoke || < 250 | On fire (will explode seconds later) | -
✔
| Health | Engine Status || ------- | ------------------------------------ || 650 | Undamaged || 650-550 | White Smoke || 550-390 | Grey Smoke || 390-250 | Black Smoke || < 250 | On fire (will explode seconds later) |
Migrating from SA-MP Wiki
Most of the content has been moved, but if you find a page that's missing, here's a short guide for converting content to Markdown.
Getting the HTML
-
Click this button
(Firefox)
(Chrome)
-
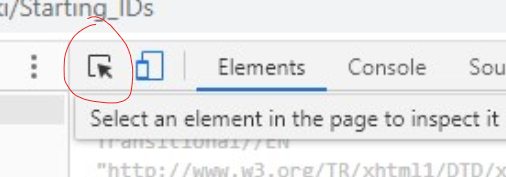
Hover the top left of the main wiki page, in the left margin or the corner until you see
#content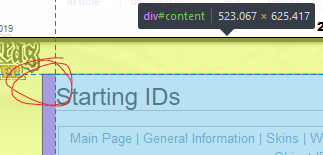
Or search for
<div id=content>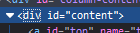
-
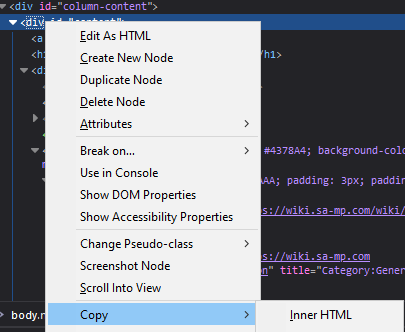
Copy the inner HTML of that element
Now you have only the HTML code for the actual content of the page, the stuff we care about, and you can convert it to Markdown.
Converting HTML to Markdown
For converting basic HTML (no tables) to Markdown use:
https://mixmark-io.github.io/turndown/
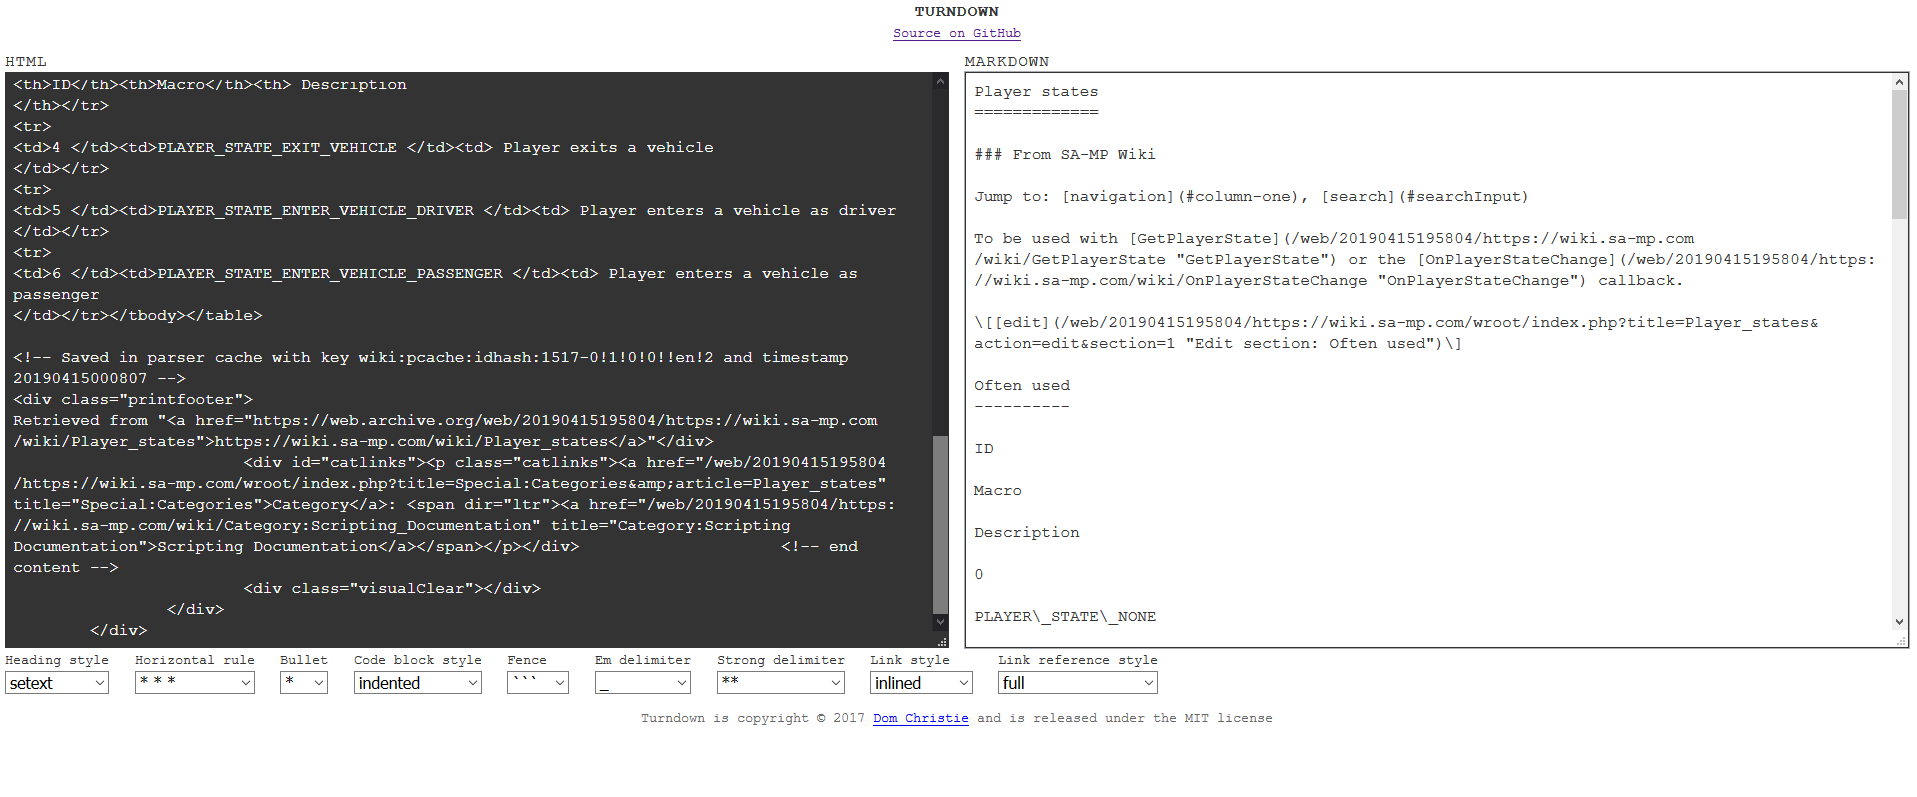
^^ Notice now it screwed up the table completely...
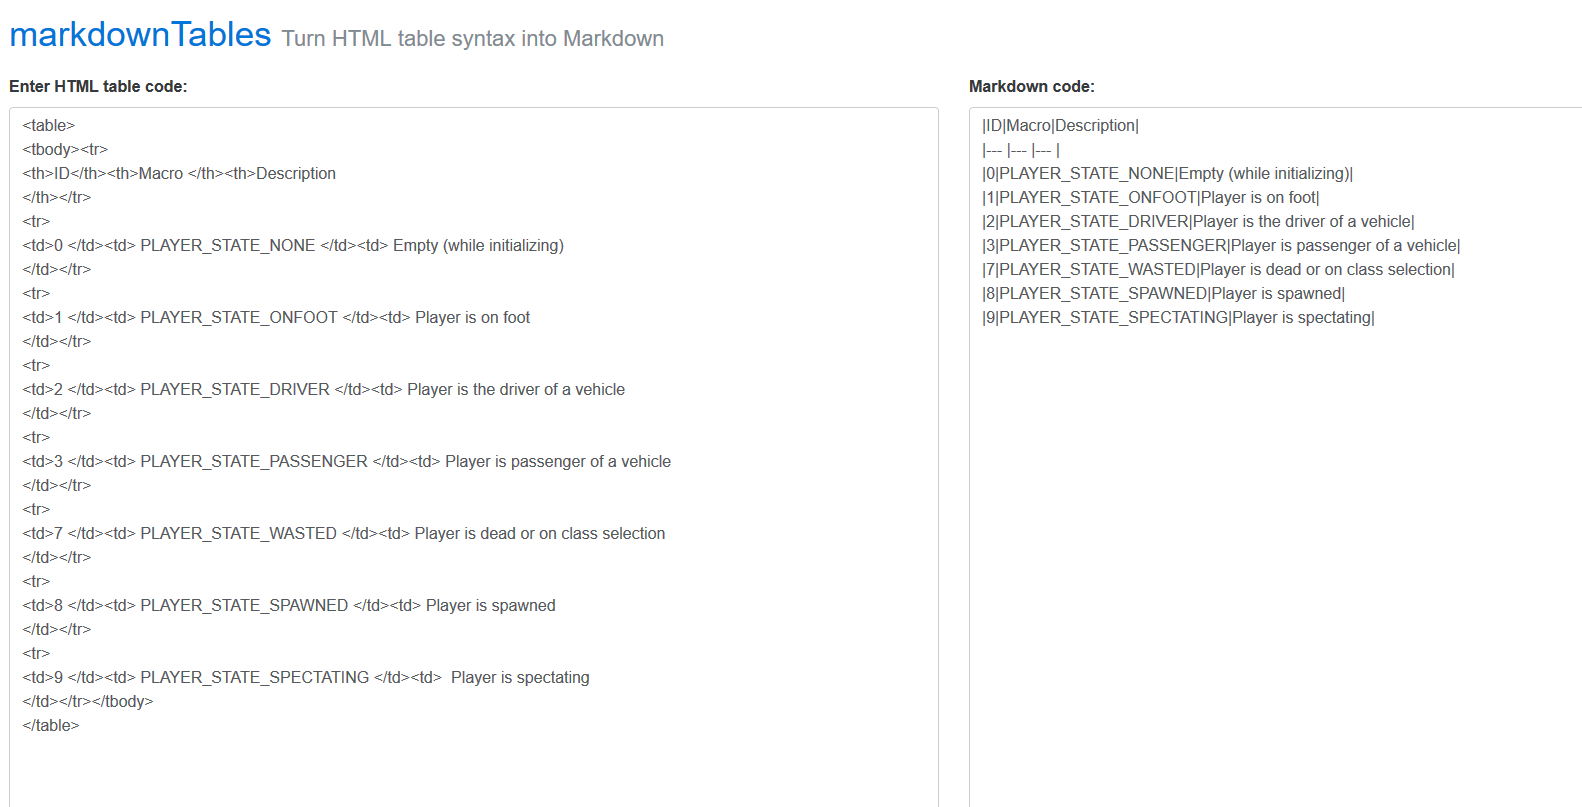
HTML Tables to Markdown Tables
Because the above tool does not support tables, use this tool:
https://jmalarcon.github.io/markdowntables/
And copy only the <table> element in:
Cleaning Up
The conversion likely won't be perfect. So you'll have to do a bit of manual cleanup. The formatting extensions listed above should help with that but you may still need to just spend some time doing manual work.
If you don't have time, don't worry! Submit an unfinished draft and someone else can pick up where you left off!
License Agreement
All open.mp projects have a Contributor License Agreement. This basically just means you agree to let us use your work, and put it under an open-source license. When you open a Pull Request for the first time, the CLA-Assistant bot will post a link where you can sign the agreement.